- Raspberry Pi Model B with 512MB RAM
- 4 GB Flash Card (SDHC)
- Power Supply (USB A - 1A 5.25 VDC)
- USBA - Micros USB B Cable
- Red Case (from element14)
- Ethernet Cable (CAT5)
- HDMI Cable
- HDMI to DVI-D Adapter
- Acer Monitor (DVI-D Input)
- USB Keyboard
- Raspbian (Wheezy) OS Disk Image (get it here)
- Win32 Disk Imager (get it here SourceForge)
- Free MD5 SHA1 Verifier (get it here CNet)
- Windows 7 x64
I downloaded the disk image using torrent, you can get the torrent file through the link above. It's always a good idea to check any data or executables (especially programs/executables) to ensure it has not been tampered with; for this purpose I used a free piece of software called Free MD5 SHA1 Verifier. The verifier software creates an MD5 or SHA checksum from the data in the file I downloaded, and then compares it against the publishers checksum (also called a hash sum). In this case raspberrypi.org displays an SHA-1 checksum on their webpage for you to compare with.
Now with the operating system (OS) image verified, we have to 'burn' the image to a disk. Since I have a Windows PC I used Win32DiskImager to burn the image to my 4GB SD card. An image is basically a bit by bit exact copy of a chunk of data, in this case it is an exact copy of a working OS made for the Raspberry Pi.
- The image comes in a zip file, so you need to extract it to a folder.
- Run the disk imager and hit the folder icon to browse to the image file.
- Select it and hit the save button.
- Select the device you are writing the image to in the drop-down menu labelled Device (my SD card appeared as disk G).
- Verify this is the correct disk before you press Write because this will overwrite any data currently on the disk.

You should end up being able to see a small portion of the disk in Windows because it is formatted as FAT32, this is the boot portion of the operating system and should be about 56MB.
Now we can connect the RPi to the peripherals. I am using one of my PC monitors for the initial set-up using an HDMI cable with a DVI-D adapter (this came with my graphics card). I will be using either VNC Server (remote desktop) or an SSH command line terminal with my RPi after set-up and therefore will no longer need a monitor.
Note: There is no hardware power switch on the board, connecting the power cable turns the computer on, so I leave that step for last.

Connect the Ethernet, HDMI and keyboard as shown above.
Insert the SDCard carefully into it's slot on the underside of the board.

And then connect the micro-USB cable to it's connector on the board to apply power.

The computer will immediately start loading system files into RAM when the power comes on; then there are a few initial configuration settings to choose in the Raspi-config tool. For a complete description of this program and the options offered, the documentation here is quite good. I will just provide a list of my choices and describe a bit of my reasoning.
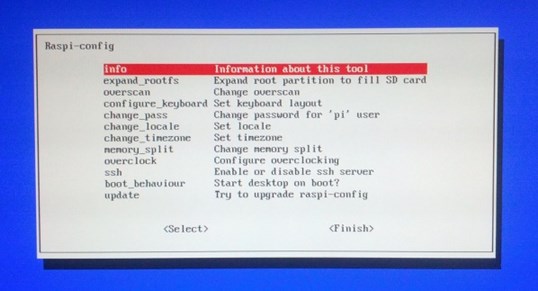
expand_rootfs - the card is now divided into a boot partition and the root partition which contains all of our OS files, this option will expand the root partition to use any empty space leftover on the card.
change_pass - the default password and username are on the website Username: pi Password: raspberry so you should probably change it.
change_locale - this determines the default settings for time/date, language and currency formats. I live in a commonwealth country so I chose en_GB.UTF-8.
memory_split - this determines how much of your 512 MB ram is used for graphics, in my case I plan on mainly using this as a headless Linux box (no desktop graphical user interface) so I chose 16 MB.
overclock - is an interesting thing to experiment with, but that's for a whole other post and doesn't need to be configured yet (keep default settings).
ssh - This enables a server to start up at boot time that handles a secure connection for remote control of the computer. I have enabled this, but again I'm going to save setting it up for another post.
boot_behaviour - I am planning on using a remote connection that does not require the desktop environment to be running, so I will disable boot to desktop. But if you wish to use your Raspberry Pi right away and use a more familiar sort of graphical interface you should probably choose to boot to desktop.
Now we hit finish and choose to reboot the computer; it will finish setting itself up based on your choices as it restarts.
This is where I am going to end this post, but I am planning several follow ups in order to document my fun with over-clocking, setting up a LAMP stack, and adding a torrent service.
No comments:
Post a Comment